How many tiles do you need?
Measure the area you want to cover and divide that by 4. We recommend that you add 10% for waste/replacement tiles. Use our Project Estimator above if you need help.
Color Disclaimer
There is a difference in shade from batch to batch and we do not guarantee that the color in the image will match the tiles you receive. We suggest that you order all the tiles that you need for a project as well as any overages in one order to ensure that all the tiles are from the same batch. If you are trying to match an old order, please send images before placing the order so that we can try to match the color.
Grid & Seam Covers
If you are looking to match your suspended grid system to the tiles, consider ordering our grid/seam covers for a perfect match.
Our grid/seam covers could also be used in glue-up applications to achieve a seamless look!
Border Tiles
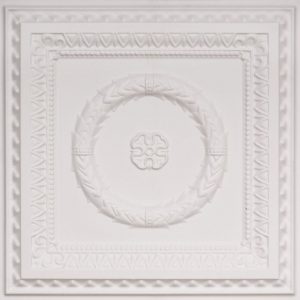
The border tile is an attractive, slightly textured tile that is perfectly suited for use as a border tile. The pattern-free design allows it to lay flat, even when cut to size, which eliminates the worry of gaps.
Certifications

Waterproof
Materials used in the construction of the tiles are 100% waterproof. This makes the tiles mold and mildew resistant!

Class A Fire Rated
Tiles have been tested in accordance with ASTM 84e and scored a Class A rating for flame spread and smoke generation. This fire rating is important if your ceiling tiles need to meet local fire codes.
WARRANTY & RETURNS
RETURNS
If you’re looking to return or exchange your order for whatever reason, we’re here to help! We offer returns or exchanges within 90 days of purchase. You can return your product for store credit, a different product, or a refund to the original payment method.
Any product you return must be in the same condition you received it. Please keep the receipt.
We do not accept international (non-US) returns.
INSTALLATION INSTRUCTIONS
Follow these simple steps to glue tiles:
- Wipe off the ceiling/surface to make it smooth and even. Remove loose plaster, paint, wall paper etc.
- Before you begin, lay a few tiles out on the floor to check the size and overlap. Note that our tiles are not exactly 24″ x 24″. They are either 23.75″ x 23.75″ or 24.25″ x 24.25″ depending on the style that you purchase. This is important to know when planning the layout.
- Use grid paper to plan your layout. Indicate any obstacles such as lights and vents on the ceiling. Plan an even border on all sides for a symmetrical look.
- It is recommended to start installing from the center of the ceiling.
- Draw straight lines on the ceiling to outline the first tile at a 90-degree angle.
- Apply a thin layer of a good quality adhesive, we recommend using either Dap Weldwood Contact Cement or PL Premium Advanced by Loctite, on the edges and crossed section of the tile. We also suggest applying the adhesive on the ceiling for better bonding.
- Place the first tile into the required position and press firmly but gently.
- With overlap – For the remaining tiles, overlap the edges of each previous tile by your predetermined amount of overlap. The tiles can be cut with scissors to achieve a desired size.
- Without overlap (using Artile grid/seam strips) – For the remaining tiles, place each tile next to the previous tile, with edges touching. Use Artile grid/seam strips to confirm you are placing the tiles with the correct spacing.
- Tiles can be glued to sheetrock, drywall, plaster, cement, wood paneling, or plywood. Verify on the adhesive of your choice whether it will work for both the ceiling tile material and the material to which it is to be adhered.
- Ceiling tiles should never be applied directly to popcorn ceilings. There are several ways to create an appropriate surface. You can remove the ceiling texture, add a new layer of drywall over the existing surface, or install furring strips.